Owning a pet jumping spider is not complicated compared to other types of spiders. A spider that prefers small enclosures, pet jumping spiders are nice to look at, educational, and easy to handle and play with.
With proper care, pet jumping spiders don’t easily get sick either. Opportunistic feeders, they take on any food bait you feed them, sometimes even insects larger than themselves.
The typical jumping spider lives between 1 and 2 years and taking care of it properly will ensure it will be healthy and playful during its life.
Often subject to illnesses caused by factors you cannot control, jumping spiders can also fall ill due to improper care. This is a guide on how to care for a jumping spider from the early enclosure planning to the last days of its adult life.
Table of Contents
Jumping Spider Facts
Many traits make jumping spiders, part of the Salticinae group, unique. The following traits are mostly related to what can be expected when keeping them as pets.
- Jumping spiders live between 1 and 2 years
- They jump or leap for food or easy movement
- Jumping spiders can climb vertical and even smooth surfaces
- Jumping spiders can get fat from eating too much or skinny from not eating enough
- Jumping spiders should be kept in individual enclosures due to their cannibalistic traits
- They can bite, but their venom is not dangerous to humans
- Jumping spiders may only bite when roughly handled
- Male and female jumping spiders may look completely different
These types of spiders are typically seen as pets that grow in individual enclosures, without any other types of spiders, even of their species.
Common Jumping Spiders in North America
There are many species of jumping spiders in North America alone. All of them can be interesting pet spiders. Some have a more striking appearance which makes them interesting to see while others are pet spiders based on their common nature alone.
1. Red-backed Jumping Spider
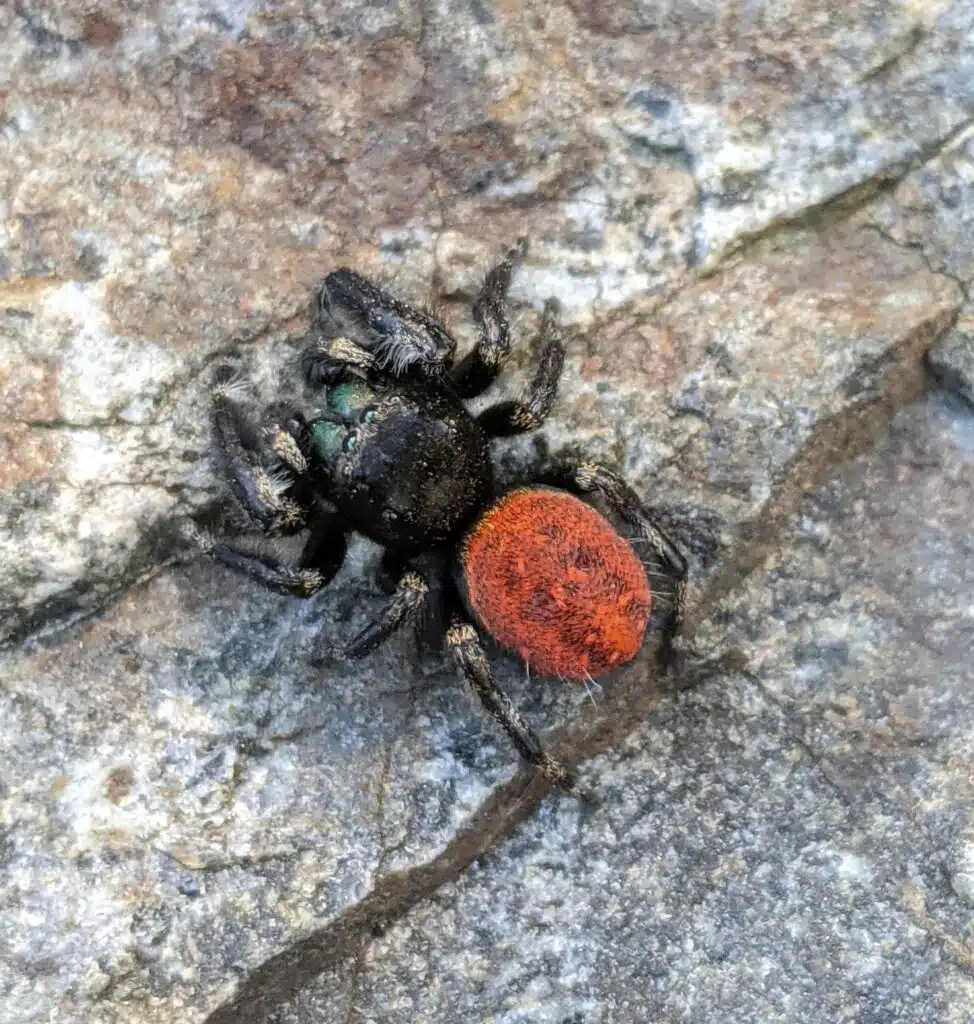
A combination of black and red contrasting colors make up the striking appearance of The Red-backed Jumping Spider (Phidippus johnsoni). You may capture it to turn it as a pet in the Western half of the US.
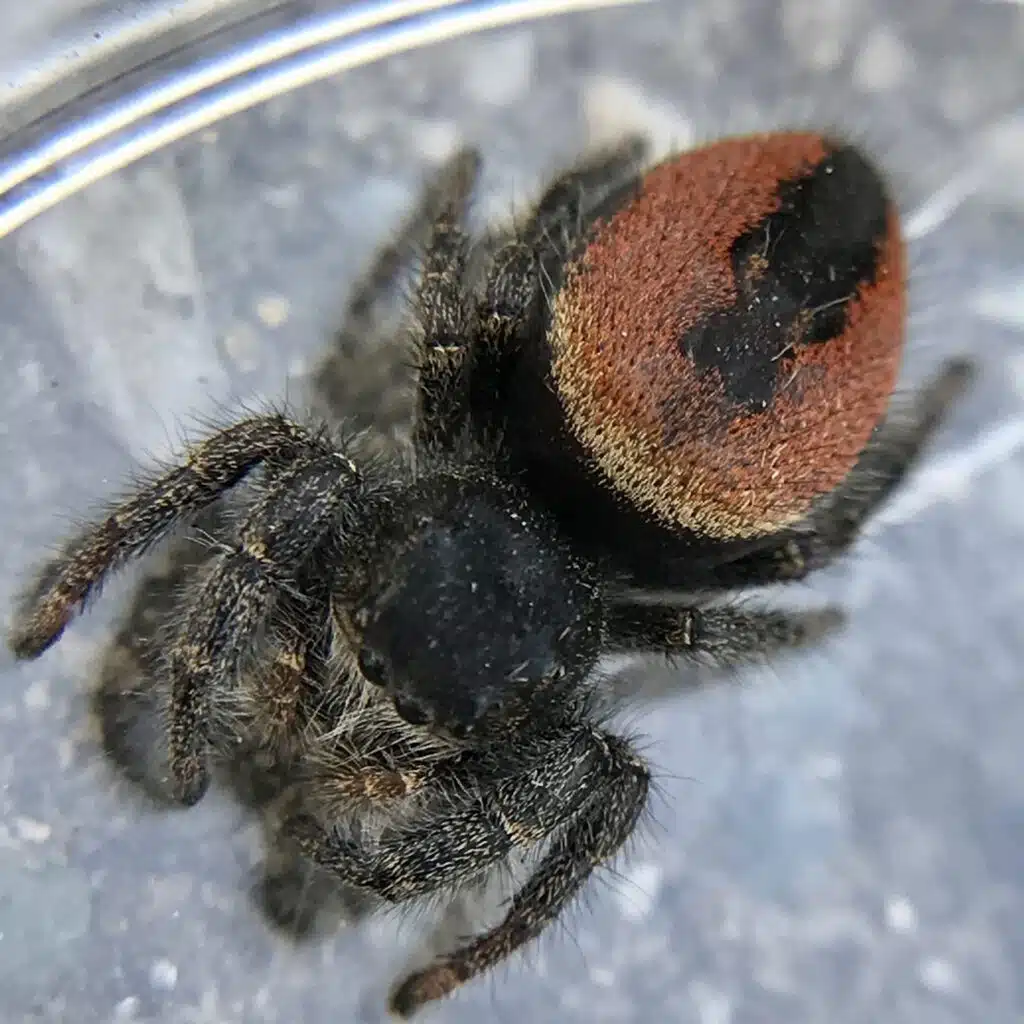
2. Regal Jumper

A species growing to 0.7 inches specific to Eastern North America, Regal Jumping Spiders (Phidippus regius) can be spider pets of a different color. Females are red while males are mostly black, with a few white marks.
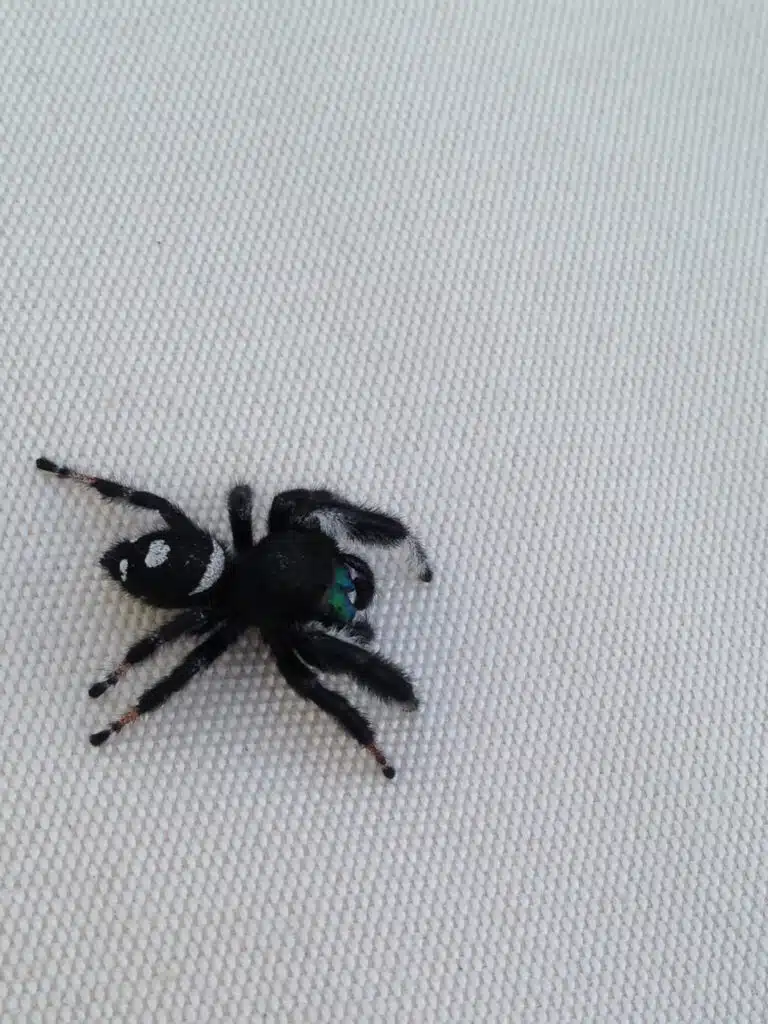
3. Bold Jumping spider
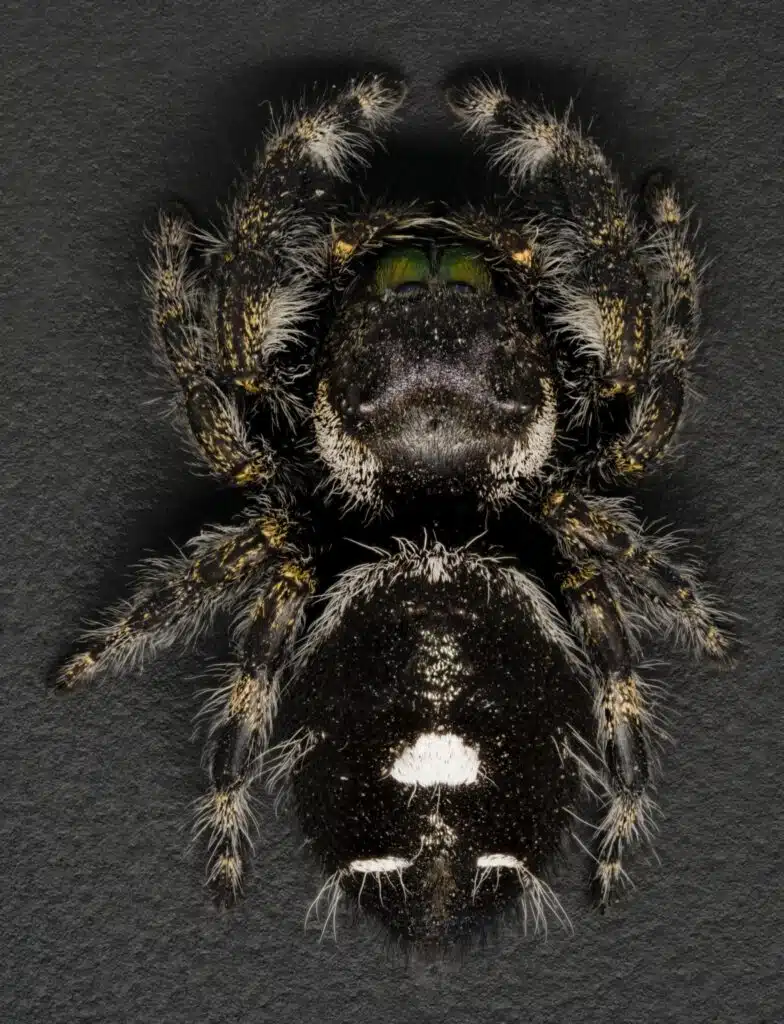
You may want to keep Bold Jumping Spiders (Phidippus audax) as pet spiders due to their iridescent mouthparts. Highly diurnal, they can be spotted moving around and eating in their enclosure during the day, retreating at night.
Before Having a Jumping Spider
A jumping spider makes a great pet spider with minimum care. It doesn’t require more attention than other types of spiders or special food, which makes it great for novices. However, there are some things you need to know before having a jumping spider.
Are Jumping Spiders Good Pets
Jumping spiders are ideal spider pets for those who don’t want to deal with a venomous species but would still like to have an interesting-looking spider.
They make great spiders as pets as they are fun to observe. Their large eyes give them solid vision and they’re even as good as following you around as you move around the enclosure.
Jumping spiders are also opportunistic feeders which makes them ideal for just about any type of bug of a similar size they can eat.
As opportunistic feeders, they aren’t fussy about being fed dead or alive food and they show the tendency to jump on the fed insects immediately as they’re quick to notice them in the enclosure.
Affordable to purchase, feed, and maintain within the enclosure, jumping spiders are also great pets because they jump.
Leaping their way through the enclosure makes them more spectacular than other slowly moving spiders.
The pros of jumping spiders as pets
- Jumping spiders come in all types of colors
- They jump high, even a few times their body length
- They can sometimes live up to 2 years, longer than some species of spiders
- Jumping spiders only need small enclosures, ideal for small homes and those without much storage space
- Some enclosures don’t even require watering (jumping spiders take the water out of their prey)
- You can play with these spiders
- Bites are rare and usually not harmful
The cons of jumping spiders as pets
- You can only keep one spider per enclosure due to cannibalization
- Fed crickets may harm your spider with their robust mandibles
- Jumping spiders may molt 9 times within a year, a period when they shouldn’t be handled
Costs and Responsibilities
As with all pets, jumping spiders come with an associated cost. This cost is minimal and smaller than the cost of tarantula pets and their associated spending.
Invest in proper housing – even the smallest housing is sufficient for these spiders. A housing of 3-5 inches with a height of 7-10 inches is about the minimum standard when it comes to individual jumping spiders in captivity.
Maintenance costs are minimal – these costs include the LED lights, sealants, and the added vegetation inside of the enclosure.
Weekly food costs are minimal – from flies to bugs such as crickets, these spiders don’t cost much to feed. Wax worms are typically sold in large numbers for a low price and can be a cheaper food for jumping spiders.
Pet Jumping spiders can bite
Jumping spider bites are rare and not serious. However, these spiders may still bite. The early months are the periods when these spiders are most likely to bite, not yet accustomed to humans handling them.
Spiders of this genus may still bite when roughly handled, turned over, or when they are squished. Gently handling them for short periods of up to a few minutes per day is the best way to avoid a bite.
While not deadly to humans, the bite can sometimes lead to allergic reactions. Most humans show no type of severe reaction to the bite of jumping spiders.
However, people with allergies may show even severe reactions that are more than a simple pinch of the sting of a bee, the pain level their bite is associated with.
All severe reactions and even skin-level reactions that don’t go away within a few hours should be followed by a doctor’s appointment.
Pet jumping spider limitations
Friendlier and often interesting to watch, jumping spiders also come with a few limitations as pets. Here’s what you need to be aware of.
1. Males have very short lifespans
Most studies and species fact sheets note jumping spiders live anywhere between 1 and 2 years. However, these are general lifespan expectations per species led by females as males live much shorter lives.
A typical male jumping spider only lives around 4 months, which means it can only be a pet for a short period. Make sure to ask about the gender of your jumping spider and its age when purchasing one from the pet shop as the spider does not have much longer to live, especially in the case of males.
You may purchase an adult spider already halfway through its lifespan
Most pet stores cannot guarantee the lifespan of a jumping spider. Stores typically inform clients of the estimated age of a jumping spider which helps the owner properly plan their pet’s life and enclosure.
2. You need plenty of flies to feed them for a long time
Simply adding a few flies to the enclosure here and there might not be sufficient for jumping spiders. Younger ones are even known to eat up to 3 flies per day.
There are even spider breeders that feed the jumping spiders as often as every 3 days. A large number of insects is needed to feed these.
This is why ensuring a constant food supply to spiders may require ordering proper spider bait regularly. Furthermore, some types of bait, such as large crickets may not even be recommended. Smaller crickets are the only ones recommended for jumping spiders.
3. Sudden temperature changes can kill the spider within hours
Unlike with dogs, cats, and other pets, spider pets are highly weather-sensitive. Jumping spiders, in particular, show a dislike of cold weather and may not survive prolonged periods of cold temperatures.
High-temperature variation kills jumping spiders. For example, a window that you forget to close during the winter may kill the spider in the enclosure within a couple of hours.
Jumping spiders may also enter a state of diapause or no activity as a result of exposure to cold weather.
These spiders also prefer not to be out in the sun for too long as they can dehydrate. Leaving the enclosure next to a window that gets sun through the day may kill the spider of dehydration within days or weeks.
Where to get a jumping spider
Associated costs can rise when you buy a jumping spider. However, many people simply catch one around the house and place it in the enclosure without even going to the pet store.
The pet store – pet stores are ideal places to get rare spiders or spiders that you cannot find in your area. Each area of North America has different spiders and spiders from around the world may only be purchased through a pet store.
Around the house – the easiest way to get a jumping spider is to find it around the house. They can often be found on the outer walls of the house where their 2 large central eyes help them spot prey from above. They can be captured by holding a stick or your hand in front of them as they typically leap onto it as curious spiders.
From a breeder – spider breeders are among those that have specialized species, hybrids, and spiders used to humans in their enclosures. Groups and communities of spider breeders are the best places to meet new spider breeders.
Housing
Housing options are typically pre-made enclosures that come in all shapes and sizes. Transparent enclosures are recommended as these allow natural light to make its way inside.
Enclosure
Not all types of enclosures are ideal for jumping spiders. Even more, they may need to be updated as the spider grows. An old spider may need materials easier to climb on as they lose their agility over time. Here’s what a jumping spider needs.
Small enclosures work best
Enclosures of just several inches are sufficient for these spiders. Tall enclosures are recommended as these spiders like to climb their walls and because different types of tree-like vegetation can be added inside.
Acrylic enclosures are recommended for their transparency, affordability, and practicality. Most of these are easily assembled but the way they open might be just as important.

They can have a top opening or a side opening. The idea is that jumping spider enclosures need to open easily, without damaging the nest and the vegetation inside.
Climbing options
Vegetation, bark, paper, wood, and other natural elements are recommended inside these enclosures. Pet owners should be particularly careful when picking up nest decorations from the outdoors.
Bugs and mites can make their way into the enclosure by accident, and they may be damaging to the jumping spider.
Picking up vegetation from parks and gardens should also be planned properly. Many types of natural elements are sprayed with pesticides, which kill jumping spiders. You can either order nest vegetation and decor online or pick up a safe spot to collect them from.
A sturdy climbing surface
Jumping spiders are mostly arboreal and prefer high vantage points for hunting and for escaping potential predators.
This nature of the spiders makes them prefer the higher points of the enclosure itself.
Apart from placing a tall hard object such as a piece of bark inside the enclosure for spiders to climb on, you may also need to exercise caution when opening up the enclosures with a top lid.
Jumping spiders may build their hammocks right at the top of the enclosure and they may be harmed when the lid is open.
Branches and even small trees might be a good idea inside the nest. Tree bark tends to work wonders when it comes to offering a sturdy but lightweight surface to climb on for jumping spiders.
These can be collected outdoors, as long as they’re free of mites and bugs.
Cork bark tends to be a better alternative for most types of enclosures for looks and sturdiness without the weight.
Artificial vegetation can also be added inside the enclosure as a means of decoration or as a climbing surface. Real trees and leaves might not be feasible inside the enclosure.
However, you can use fake leaves and plants as a climbing surface because jumping spiders like to hide at night.
They need a retreating location to hide in as they do this to avoid predators. Adding a bit of extra fake vegetation can help them find multiple hiding spots at night.
The location of the enclosure matters
Apart from the shape and size of the enclosure, it’s also important to find a good place to store it.
Ideally, you want your enclosure to sit away from direct and constant sunlight as this may lead to enclosure overheating.
Spiders of this type also need constant temperature so a room in the house that’s lived in is an ideal location for this type of enclosure.
Avoiding placing the enclosure close to other heat sources such as ovens and radiators is also important. While they don’t necessarily dislike warmer temperatures, they dislike constant warmer temperatures which lead to desiccation.
You cannot place 2 or more spiders in the same enclosure
Each spider enclosure is for one jumping spider along. You cannot add 2 or more spiders in the same enclosure as this leads to fights and even cannibalistic traits.
Breeding jumping spiders often show cannibalistic traits towards each other. Adults can also show cannibalistic traits towards offspring.
These spiders should also be kept away from other species of spiders and other pet bugs.
Individual enclosures are recommended even if you want to have multiple jumping spiders as pets.
Cleaning requirements mean the enclosure needs to be easy to open
Cleaning the enclosure is just as important as setting it up. Some of the foods these spiders don’t eat need to be cleared.
While they don’t build spider webs, jumping spiders still produce silk hammocks and may use individual silk lines to come down from a higher point.
This silk also needs to be regularly removed. Typically done every few weeks, the cleaning of the enclosure can be more frequent in the case of smaller enclosures.
While these spiders also poop, there aren’t any visible traces around the enclosure. All that’s left is to remove the silk around the nest.
Ventilation options
A typical pre-made enclosure typically already comes with ventilation holes. At least 2 holes are recommended but there are enclosures with tens of holes as well.
Ventilation is improved with opposing holes. Fans aren’t needed for these enclosures as jumping spiders may live in just about any indoor conditions as humans can.
Enclosures need substrate to absorb moisture
The substrate is typically a type of soil that’s added to the enclosure. You should aim for at least 2 inches of substrate as it helps absorb excess moisture.
Substrate is also where the moisture ends up when you spray the enclosure with water.
One of the best types of substrates is a generalist enclosure substrate. Make sure you don’t add typical earth from the garden as it can come with bugs, mites, and eggs about to turn bugs of various species.
Some even go as far as adding the soil to the oven for a few minutes to kill off any bacteria and bugs but a general type of substrate can work well for the enclosure.
Water dishes aren’t needed
Water dishes are sometimes used in bug enclosures. While they add visual appeal, bug enclosures should be avoided as jumping spiders can drown.
While they don’t necessarily drown at first when in contact with water, they can drown when falling into the water dish.
Even more, some spider pet owners don’t add any type of moisture inside the enclosure, so the water dish should be skipped here.
What does a jumping spider enclosure look like?
The enclosure of the jumping spider can look very different from one situation to another. Jumping spiders live in different habitats such as temperate forests, rainforests, deserts, and even some cool climates.
Here’s what the enclosure can look like, building it from the bottom up.
- Start with the substrate
Mixed soil is best as substrate. Different types of soil are very good at absorbing excess moisture within the enclosure. Spiders also like to walk on this type of substrate.
Sand alone doesn’t make a great jumping spider enclosure substrate as spiders don’t like walking on sand.
Jumping spiders also don’t burrow and aren’t nocturnal so sand alone is never a good idea as substrate.
- Add solid vegetation such as bark
Solid vegetation such as a large piece of bark is ideal for spiders such as jumping spiders. They like a solid surface to leap on and to play on.
Adding a large type of object in the enclosure helps spiders explore the full enclosure as well.
- Add soft fake vegetation
Vegetation in the enclosure might not be the best for jumping spiders as it may come with mites. Fake leaves, on the other hand, may decorate the solid piece of the enclosure and add a new hammocking place for these spiders.
- Consider other climbing structures
Some spider pet owners move on to complete the enclosure with other climbing structures over time.
Older jumping spiders lose their ability to jump high and attach themselves to the walls of the enclosure.
They also become less active and considerably slower.
One way older spiders may still move around is by adding new objects and climbing surfaces to the enclosure.
Cardboard and even soft paper-like tissues may be added to the enclosure for the older spiders to climb on more easily.
Angling a piece of bark in the enclosure also ensures these older spiders don’t have to climb vertical surfaces all day.
Lighting and Heating
Lighting and heating are essential for jumping spider enclosures. You may consider LED lights for dark rooms and enclosures in dark places or even no light at all in rooms with sufficient natural light.
Aim for 12 hours of lighting per day with a warm programmable light
Choosing an LED light is not complicated as most 6.000K-capable lights are enough for these enclosures. If you’re using an LED light, you may want to program it for 12 hours per day to offer sufficient light for these spiders.
Most jumping spiders are diurnal and may only consider eating with light. They tend to retreat and even hide when it’s dark, despite their large eyes.
Maintain constant enclosure temperature
Normal temperatures for these enclosures range between 69 and 83ºF. Maintaining proper temperature may be important in cool rooms but many don’t use any heating if the enclosure is located in common rooms of the house.
Normal room temperatures are sufficient for jumping spiders to live a long life. Many can even survive indoors in areas outside of the enclosure on their own so there isn’t much change in their temperature comfort in an enclosure.
Low temperatures are problematic for these spiders. Wintertime comes with a period when heating is needed in the house to avoid having the spiders enter diapause.
Temperature and air circulation
Aim to have at least 2 ventilation shafts
At least 2 air access points or ventilation shafts are recommended for small spider enclosures. Most already include multiple ventilation shafts.
Consider 4 opposing ventilation shafts for better air circulation, especially for larger enclosures. By default, enclosures come with ventilation shafts on all parts so it’s best not to block them from the inside.
Hydration
Jumping spiders don’t drink water as they take their hydration from the insects they consume. Adding a water container inside of the enclosure is not recommended, as a result.
However, maintaining proper enclosure hydration is recommended as spiders don’t like overly-dry habitats.
Spraying water on the inner walls of the container is one of the ways you can add and maintain humidity without resorting to dangerous water containers where spiders can drawn in.
Some of the signs of a dehydrated spider include lethargy or a missed molt. In the case of an improper molt, there’s nothing you can do about it as this will lead to the death of the spider.
Feeding
The type of food they eat and the eating frequency changes with the age of the jumping spider.
While each species can be different, it may be important to experiment and spot the feeding habits right for your species.
Jumping spider spiderlings – These young spiders may feed multiple times per day as they need plenty of nutrients to grow. They are also less likely to eat the insects adults of the species can. Simple flies can be fed to spiderlings up to 3 times per day, depending on their feeding habits.
Young adults – once past their spiderling state, jumping spiders may start eating after a week, or even a few days. Young adults should be given food at least 1-2 times per week, depending on how they look.
Mature jumping spiders – older jumping spiders may even eat every 1.5 weeks. It can take up to 10 days for older spiders to eat. You categorize your jumping spider as older after 6-9 months, as most live around the year with a few living up to 2 years.
Here are some of the foods you may consider for your pet jumping spider.
- Common house flies
- Fruit flies
- Small crickets
Apart from having a routine feeding schedule, you also need to know jumping spiders look very different when hungry compared to when full. Its feeding status can be observed by the shape or diameter of its abdomen which goes from thin and thread-like to round.
Very thin abdomen – a thread-like thin abdomen is a sign of a starving jumping spider. At this point, the spider can still be fed and avoid starvation. Jumping spiders should not go on for more than a month without food in an enclosure.
Mostly thin abdomen – this signals a hungry spider. A thin abdomen is visible in spiders that have not eaten for 10 or more days.
A full abdomen – a full abdomen is specific to fed spiders who’ve just eaten or who have eaten just a few days ago.
A rounded abdomen – a rounded abdomen shows an overfed jumping spider. A large meal leads to this appearance which also triggers a sluggish movement pattern and the unwillingness to jump or to jump far.
Maintaining
Maintaining a spider enclosure is easier than with most other types of small pets such as fish. An enclosure needs to be clean, warm, and with sufficient humidity for jumping spiders to thrive in it.
Here’s what typical maintenance requires.
Maintain humidity
Maintaining high humidity in the enclosure is recommended. Higher humidity may require spraying more water inside during the warm summer months.
Distilled water is recommended for spraying the enclosure. You can add 1 spray per wall or 1-2 sprays of distilled water per maintenance routine.
When to worry your spider is dehydrated
- Long periods of inactivity or lethargy
- Not eating normally or not eating at all
- Losing activity levels or not jumping
- Not climbing the enclosure
- Change out the substrate every few months
While it may seem the substrate is there for life, it needs to be changed frequently.
Food remains and silk building on the substrate recommend changing it every few months. You can aim at swapping out the substrate at least 2-3 times per lifespan of your jumping spider.
In addition, all types of foods on the substrate the spider doesn’t eat anymore can be removed with a pair of tweezers as often as needed.
Some pet owners even feel free to change the spider’s enclosure completely to add a bit of visual variety.
This doesn’t harm the spider in any way. Even if they build hammocks in their old enclosures, jumping spiders can build new hammocks in their new enclosures.
Clear out any remaining food
All of the food remains of the spider need to be cleared out. Small enclosures can quickly get overrun by insect parts which you can remove as needed.
Some spider breeders don’t remove these traces, on the other hand. Depending on your enclosure, the substrate, and the decoration inside, you may want to check for visible food traces to eliminate them without disturbing the spider too much.
Tools recommended for enclosure maintenance
- Sprayer for distilled water
- Tweezers for clearing debris and food remains
- LED lights for illumination
How to add moisture to a jumping spider enclosure
A sprayer comes with the mist needed to add humidity to the enclosure. You may want to use distilled water with a sprayer at least once per week to maintain humidity levels.
Once per week – you can spray the enclosure once per week if there’s no water container inside.
Once every 2 weeks – the presence of a water container in the enclosure only requires spraying it once every 2 weeks. Make sure to add just a little bit of water to the container as these spiders can still drown.
Molting
Spider molting is the process in which the spider sheds its exoskeleton to grow a larger one. Up to 9 molts are specific to jumping spiders in their lifetime. Here’s what to do when the spider molts.
Pre-molt
Before molting is characterized by low appetite. Jumping spiders will not eat at all during the molting process.
This is an important time when you typically spot the unaltered food you live inside the enclosure.
It marks the time when you need to remove the food as a molting spider can be hurt by live food such as living crickets. Also, make sure to remove all of the sharp objects inside as the spider can injure itself on these as well.
Molt
During the molt itself, the spider becomes soft before its body becomes hard. At this vulnerable stage, the spider should not be handled.
Misting the enclosure is one of the few beneficial things you can do at this stage as proper humidity helps keep mis-molts away.
After molting
Jumping spiders can take minutes to days to complete a molt. One of the ways you can identify the post-molt period is by observing its activity levels.
A spider still hiding in its hammock is a spider that is yet to complete its molt. The moisture of its body is to be absorbed before its exoskeleton hardens.
Once its exoskeleton hardens, the spider may leave its hammock become active, and jump around again.
You should not feed the spider during its post-molt stage when it largely remains inactive as live prey may still hurt it.
How many molts does a jumping spider have
A typical jumping spider goes through 8-9 molts, even as often as once per month.
Spiders that live 2-3 years may take longer between molts but still have up to 9 molts per lifespan.
The molting periods are multiple and also periods when the spider doesn’t eat. You should not force your spider to eat during this period as many types of prey may hurt it and its soft molt-specific body.
How to spot a molting spider
A molting spider is a spider that doesn’t need to be interfered with. Here are the first signs of a molt, important when it comes to stopping feeding the spider.
A soft exoskeleton – a soft-touch spider is a molting spider easily harmed. It should not be handled as it may have yet not completed its milt.
A protective silk cocoon or hammock – jumping spiders don’t build spider webs. They prefer hammocks. A jumping spider that spends most of its time in its hammock is a molting spider or a spider that has yet to complete its molt. You should not try to remove it from the hammock for handling at this time.
Low to no activity – a lethargic spider may be a molting spider or a pre-molt spider. Jumping spiders considerably reduce their activity levels when about to molt, including limiting their jumps and movements in the enclosure.
Not feeding – a spider that doesn’t want to eat is molting, sick, or not hungry. If your spider refuses food days after its last meal it may be a sign of molting.
Handling

While jumping spiders are easy to handle, they should not be handled at any time and by any means. This is how you can play with your spider.
Jumping spiders are some of the most curious spiders in North America. You don’t even need to force them towards your hands most times as simply being close to them triggers their jumping curiosity.
Just like many types of pet bugs, jumping spiders should not be handled at any time, especially during their vulnerable molting periods.
Jumping spiders should only be handled outside of their molting period. You can identify a spider between molts by its active status, by jumping around the enclosure, and by its tendency to be active during the day and inactive only at night.
While they may bite, jumping spiders only bite when roughly handled or squished. You can let them jump on your hand and then to another hand before placing them back in the enclosure.
To handle them, you open the enclosure and drive your hand close to it. Most spiders jump on hands attracted to the bright color of the skin and their proximity.
Jumping spiders can also be handled with sticks instead of hands. You open the enclosure and bring a stick close to it for the spider to jump on.
Health And Common Illnesses
Jumping spiders do face health issues even when raised in an enclosure. They can even face more risks here as they cannot escape as they can in the wilderness. Your jumping spider’s health can be affected by the following
Illness and death caused by pesticide-treated enclosure vegetation
Pesticide in the enclosure is a sure method to slowly or quickly kill the jumping spider. Pesticides typically get in enclosures with vegetation and bark added by the pet owners from the garden.
This is why it’s always best to only add vegetation and solids from areas free of pesticides or a dedicated pet shop.
Low air quality and dry air
Air quality doesn’t need to be measured in the enclosure but it does need to meet minimum standards.
The air inside should not be cold, which is common when the enclosure is placed in a basement or outdoors.
Placing the enclosure inside in a room that isn’t vacated is among the simplest methods to ensure room temperature is constant even in the enclosure.
Dry air is as problematic as cool air in the enclosure. You want to mist the nest at least once per week with distilled water so that you avoid dry air slowly killing your spider.
Dry air can also happen when you mist the enclosure when it’s placed in direct sunlight where the water inside quickly evaporates.
Always place the enclosure away from heat sources and direct sunlight to keep the air quality constant and to avoid overheating the nest.
Improper enclosure ventilation
Poor ventilation leads to mold and low oxygen levels. Jumping spiders breathe both through lungs and tracheae which means they do need air to survive.
Enclosures typically come with air vents but you should add your air shafts when building a DIY enclosure.
Poor ventilation and over-misting of the nest also lead to mold formation. Make sure to lightly mist the nest only once per week as too much humidity may lead to mold on the inner walls of the enclosure.
Not having a natural light cycle
Natural day and night cycles are important to regulate the activity levels of jumping spiders. You need to ensure there’s light for at least 12 hours per day in the enclosure.
Either natural light or LEDs are recommended to keep the spider active and healthy during the day.
Alternatively, you can simply allow the enclosure to sit in a room without any type of light for the entire lifespan of the spider.
One of the reasons to not rely on artificial light sources is the fact that jumping spiders are attracted to light at night.
They are often found next to a light source around the house or on the outer walls of the house which may keep them up for longer than needed and disturb their resting cycle.
Apart from lights, they may also show a similar level of interest in bright objects. This is why it’s recommended to add natural-looking objects to the enclosure and not white or other bright objects.
Poor food choices
A molting spider can be killed by a cricket. Feeding a live cricket to a helpless spider is one of the fastest ways to kill it.
Crickets typically don’t stand a chance in front of healthy jumping spiders. These spiders rely on their venomous bites to immobilize the crickets and essentially drag them to a remote place where they eat them.
A cricket that faces a molting spider is a cricket that can win this fight. Make sure to remove all live food from the enclosure when you spot the first molting signs.
A spider spending all of its day in its hammock is not to be given any live bait either. This is, most likely, a spider yet to complete its molt, and forcing it out may not be the best decision as it may even lead to its death.
Your pet jumping spider can also get ill as follows
Desiccation by constant exposure to heat and the sun
Desiccation of the habitat or the dehydration of the spider is the biggest health issue faced by jumping spiders in an enclosure.
Dehydration in jumping spiders occurs through a lack of humidity in the air of the enclosure and a lack of food since they draw moisture from food.
You can also reduce dry air enclosure problems by limiting ventilation. Too many ventilation shafts fail to trap moisture which can be problematic for the spider itself.
A dehydrated spider cannot molt properly and dies during molting. Avoiding dehydrated spiders can be improved by misting the enclosure and by offering food every few days.
Failing to molt properly
The incapacity to molt properly leads to serious health problems and death within days for the jumping spider.
An exoskeleton that cannot be shed completely means the spider cannot grow and that it is about to die.
Unfortunately, you cannot do anything to help a spider stuck in a molt.
However, you can provide sufficient food and humidity inside the enclosure to ensure the spider is not going to suffer from extreme dehydration which leads to death.
Mold
Mold is dangerous and largely fatal to jumping spiders. The problem with mold is that it’s typically detected late.
Mold makes its way onto the internal organs of the spider, essentially killing it from the inside with its spores.
You can find mold looks white on these spiders many times. It might be a signal you need to move the spider into a new and properly ventilated enclosure this time.
Moving it to a new enclosure might not save the spider, but it may stop further mold formation and it may save the spider on occasion.